I will try to summarize my trading strategy based on a thread which sadly is no longer on forex factory. I have been trading using this method for nearly a year and it has proven very successful for me so I hope you will all benefit or learn from it. My method is different from the original in a few ways mainly that the original method was for scalping on the 5 min timeframe, but I also use it for longer timeframes. I have put together all the indicators I use and tried to explain how to use each one effectively.
Money Management
This is the most important step in trading, please remember that 95% of forex traders lose money and by not having a good money management plan it will wipe out your account sooner or later. A lot of people learn this lesson when it’s too late so have a trading plan in place and stick with it. Don’t try to become a millionaire overnight because it just won’t happen. Taking losses is a part of the game, so always put stop losses in place and do not use mental stops as they don’t work. At the end of each week, month or year what you need is more winning trades than losing trades and you will be part of the 5% of traders who make money. If you get stopped out don’t start worrying about what losses you need to make back, that will most likely result in more bad trades. Instead concentrate on making the next trade profitable.
When I first started to trade this method I used a 0.5% risk and a 1% reward ratio per trade. I used this for 3 months and with a very good percentage of wins. After 3 months I increased my risk to 1% and reward to 2% whilst still maintaining a 1:2 risk reward ratio and continued to have a good percentage of wins. Currently I am using a 2% risk with a 4% reward ratio and tend to scale this down depending on the setup I see. This is a high risk strategy and I don’t recommend it. I would say start with a smaller risk reward ratio until you are confident with the system and have made positive pips over a decent period of time.
I trade the following pairs with this method;
GBP/JPY GBP/USD EUR/USD GBP/CHF EUR/JPY USD/JPY
It works on most currency pairs and it can also be used on indices such as the DOW and commodities such as gold and oil too.
Indicators
60 and 200 Day Exponential Moving Averages
200 is red and 60 is blue
Auto Pivots
Use Sunday data - should be set to false
Laguerre – ACS1
On the Common tab fixed minimum -0.05 fixed maximum 1.05 for both Lags.
Blue Laguerre – Inputs tab – gamma 0.6 - Maxbars 1000
Red Laguerre – Inputs tab – gamma 0.8 – Maxbars 1000
Levels: 0.15, 0.45, 0.85
Stoch Histogram – 14,3,3
MACD – 12,26,9
Gann HiLo V2
Bollinger Bands
Chandra- SAS5
How to use the indicators
Ema’s
There are 2 ways I use them:
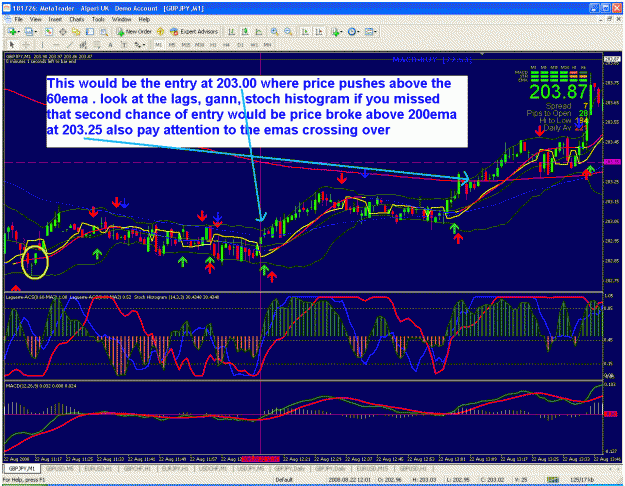
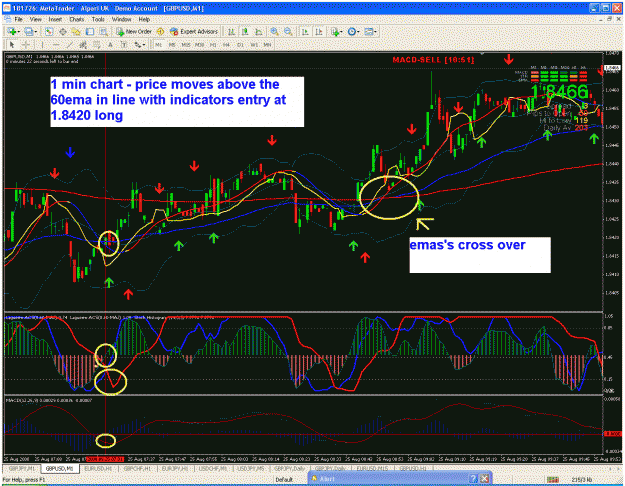
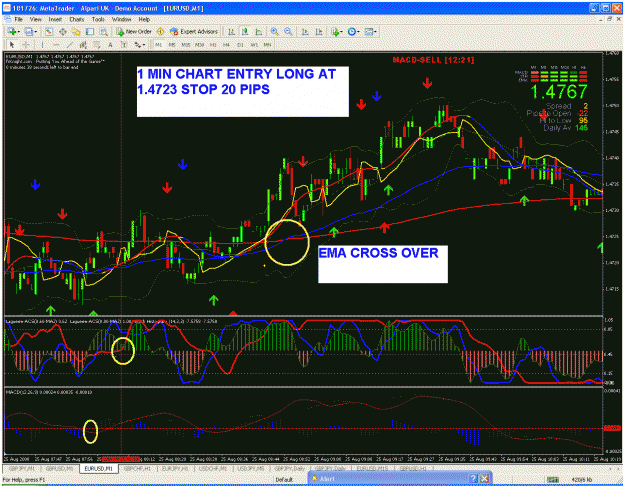
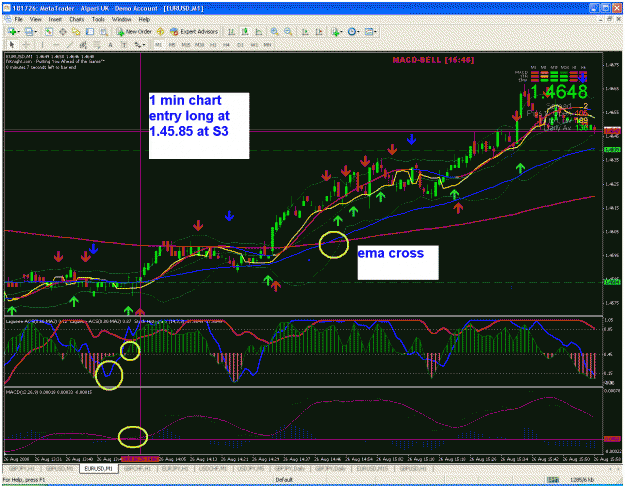
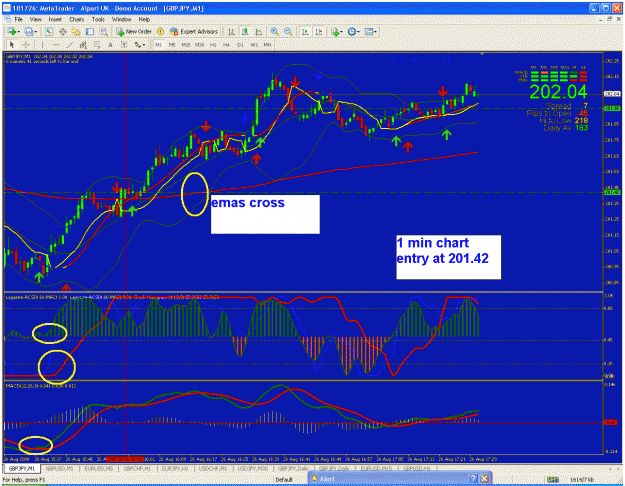
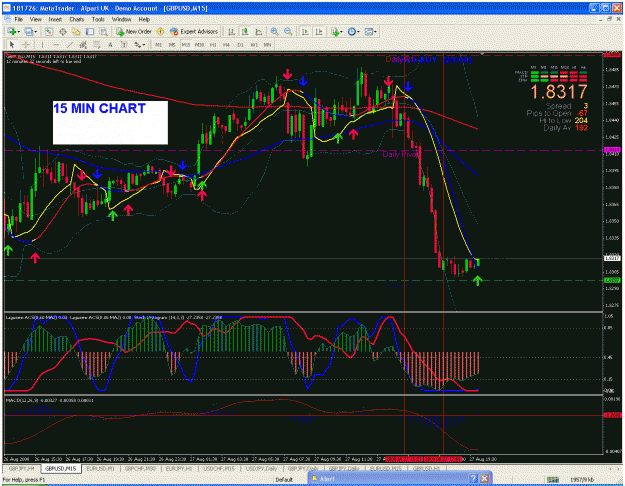
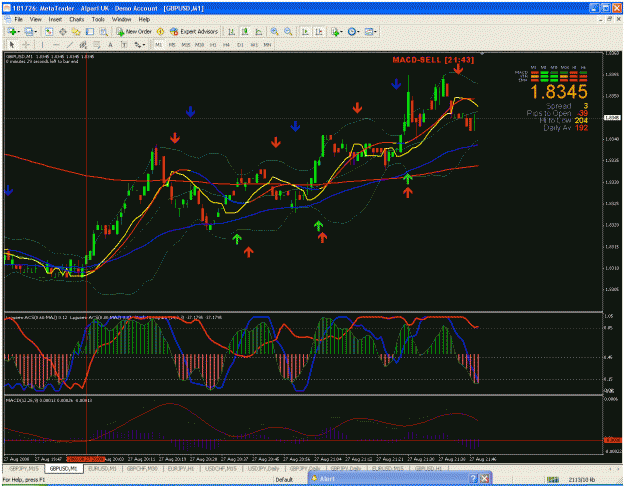
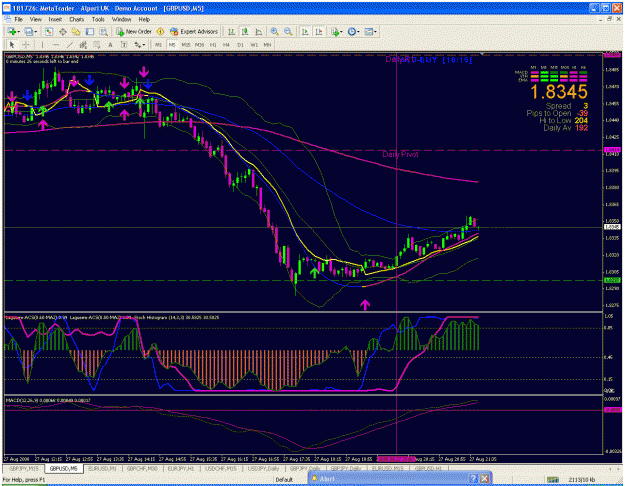
1 – The crossovers – by this I mean when the 60ema crosses over the 200ema and vice versa. Take a look at the 1 min entry chart, once the price is above the 200ema this would be a safe entry for a long with a stop below the 60ema or below the recent low to be safer. As the 2 ema’s cross over each other and the 200ema is below the 60ema the trade would be safe by moving the stop loss below the 200ema and eventually below the 60ema as the trade progresses. In this case, the price moves above the daily pivot so once a cross takes place you know that this is the direction of the trade. This applies to all the time frames. On a day when there is movement in a single direction, you will notice that the crossovers will take place on 1min chart followed by the 5min, 15min etc. In between these crosses, there will be a price movement pulling back to the ema’s in order to make the crossovers on the higher timeframes. Bear in mind that not all timeframes will show a crossover of the ema’s.
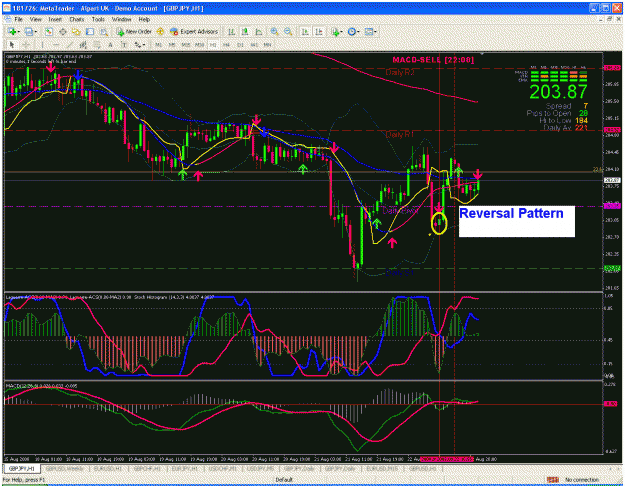
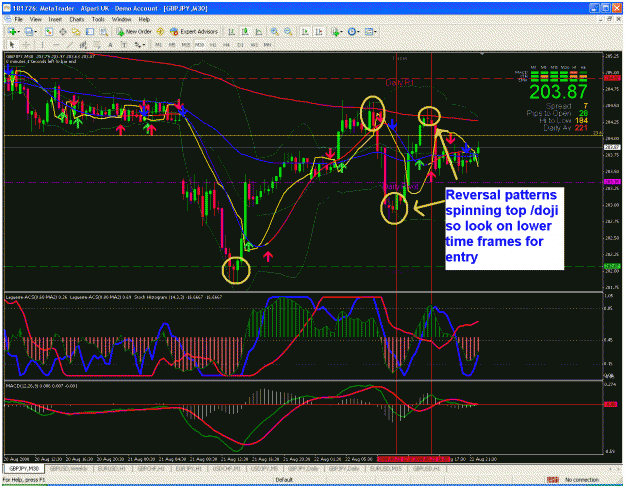
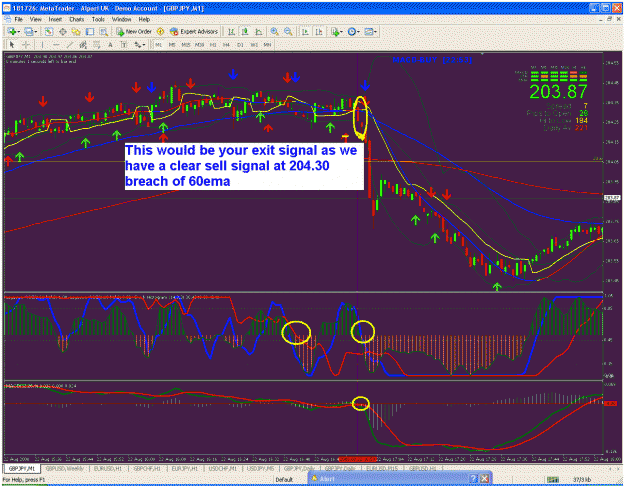
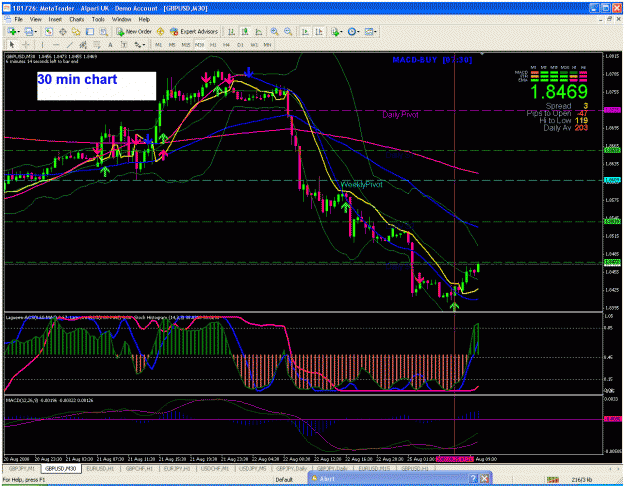
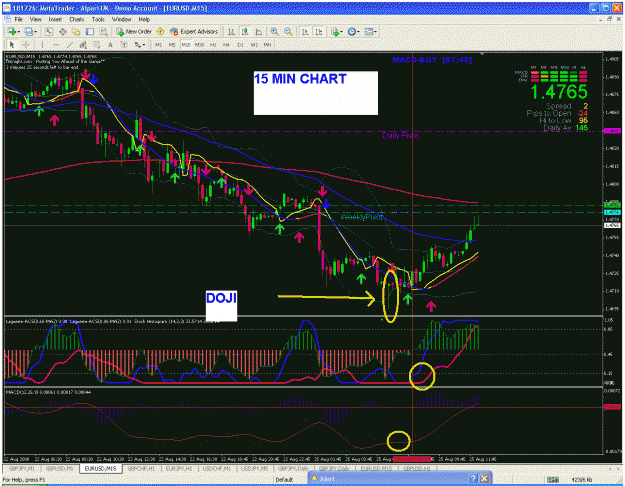
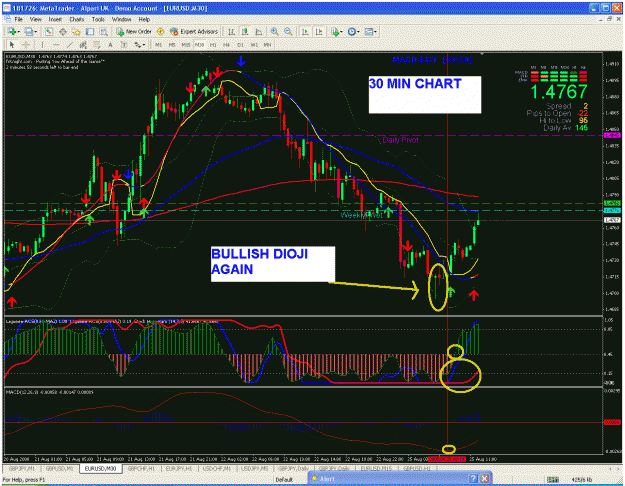
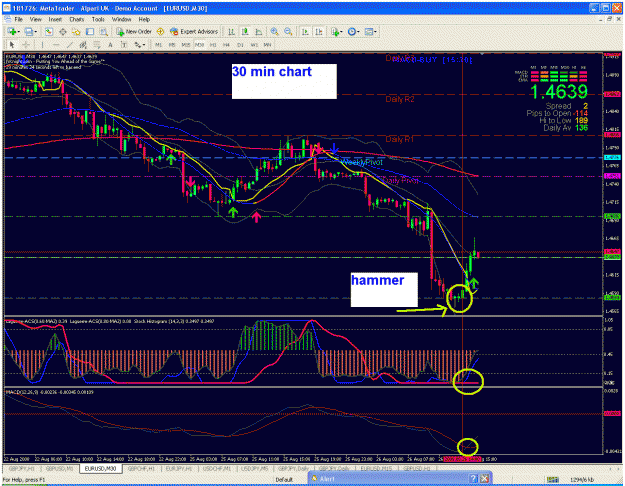
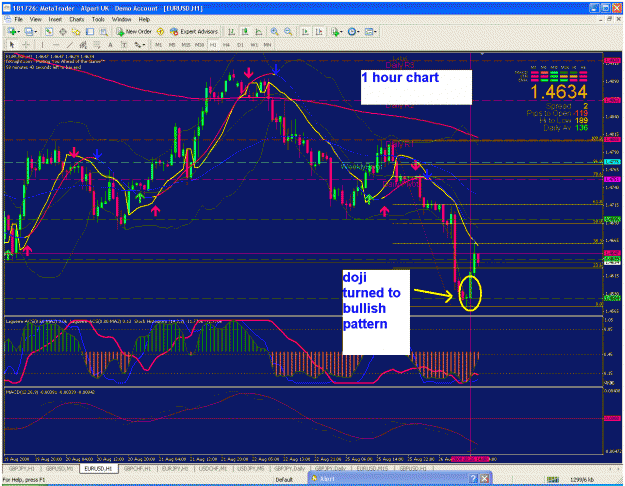
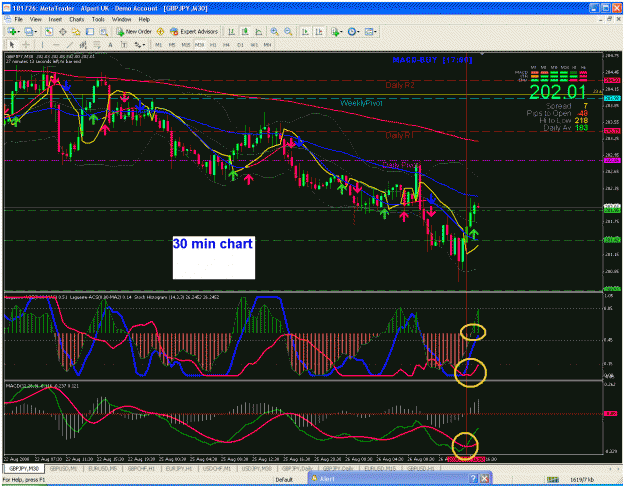
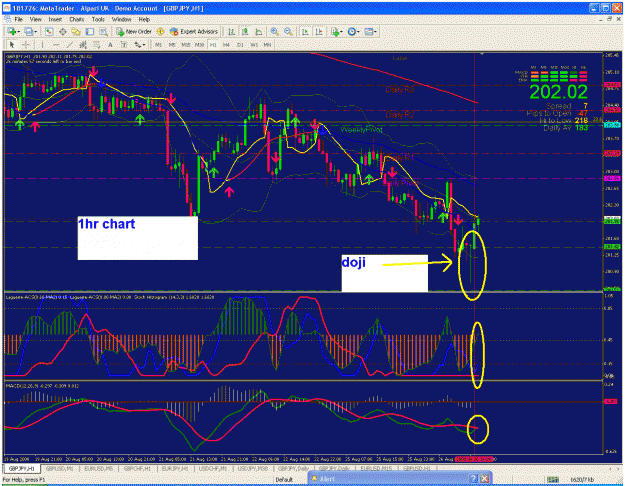
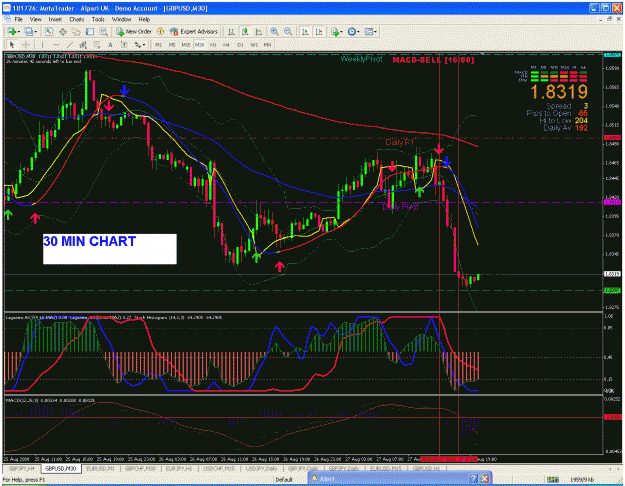
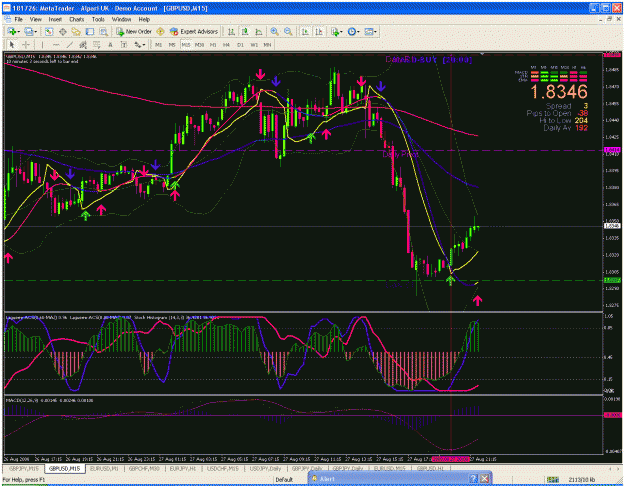
2 – Using them as support and resistance levels– once again you can use this on all the timeframes. For example, on the 1min chart at the point of exiting the trade, the candle closed below the 60ema in line with the other indicators giving a sell signal. Also, take a look at the 30min chart as it failed to break above the 200ema and gave a clear reversal pattern in the form of a doji. I move my stops according to the ema’s on the 1min or 5min charts but I will explain this in more detail later.
Pivots
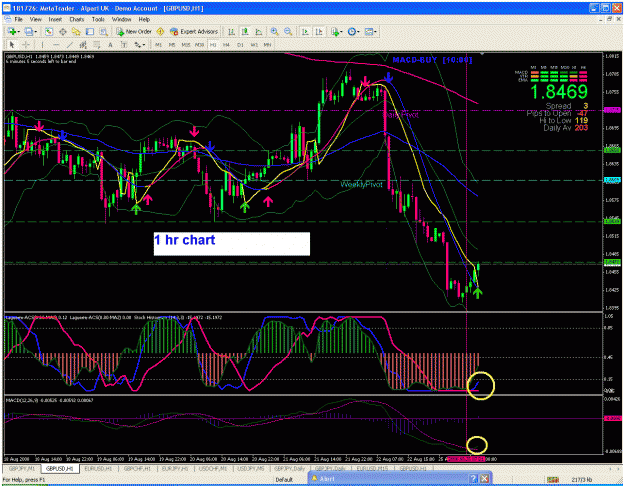
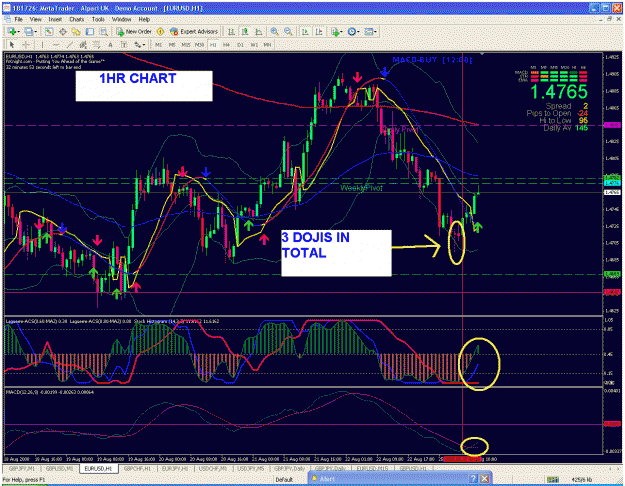
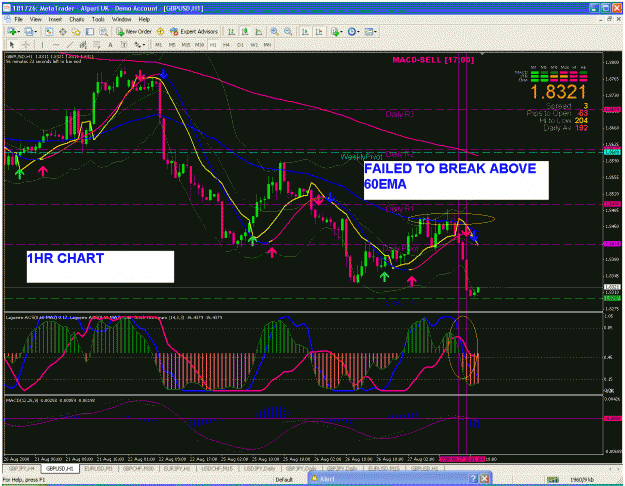
These are your support and resistance levels. You should look to enter or exit a trade at these levels. For example, if you look at the 30min or 1hr chart you will see that the price bounced off S1 with clear reversal patterns on both timeframes.
Laguerre
I also use these in 2 ways:
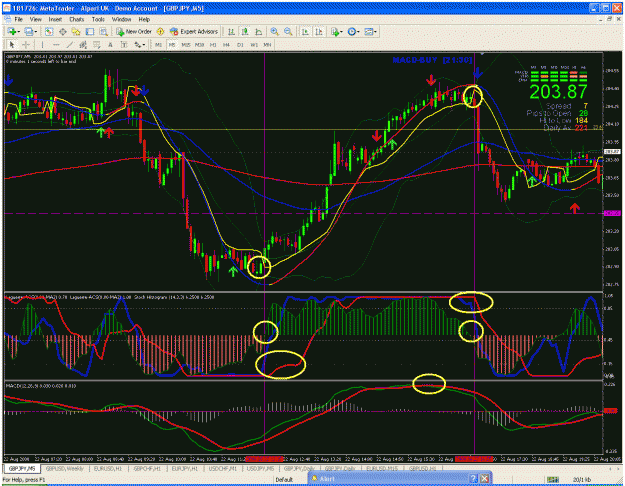
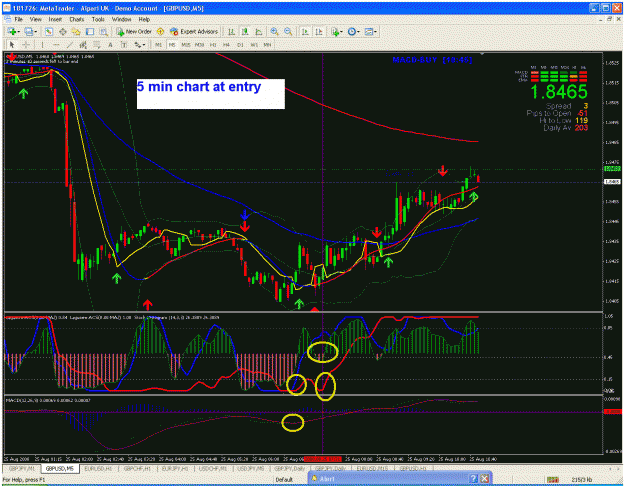
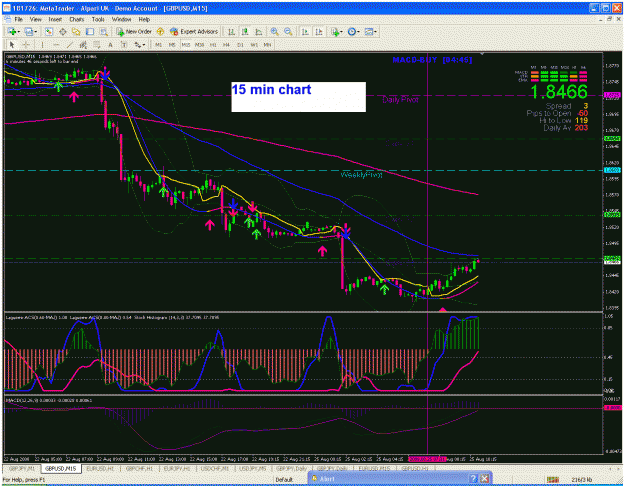
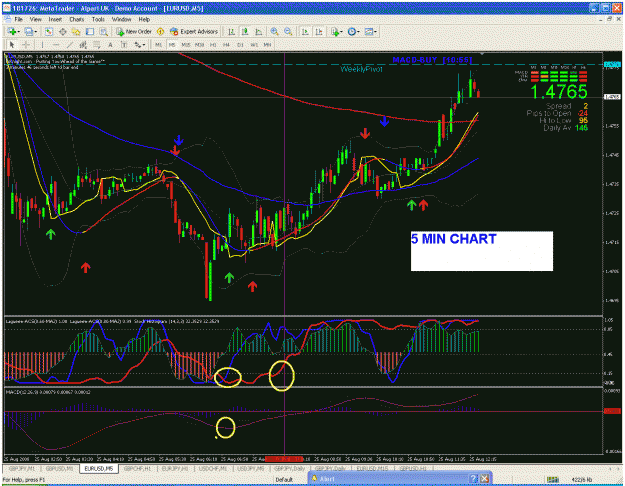
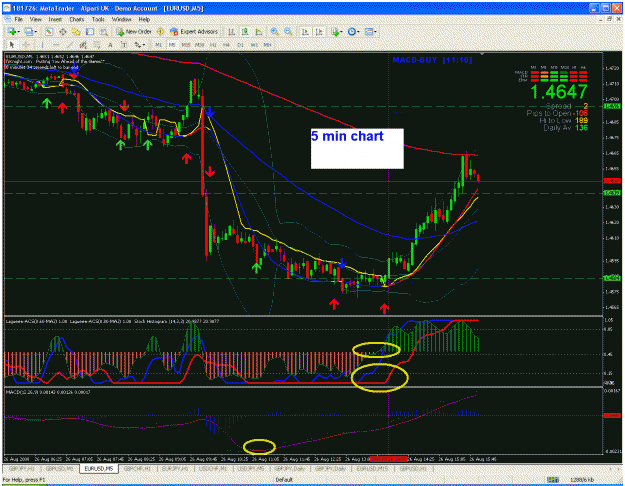
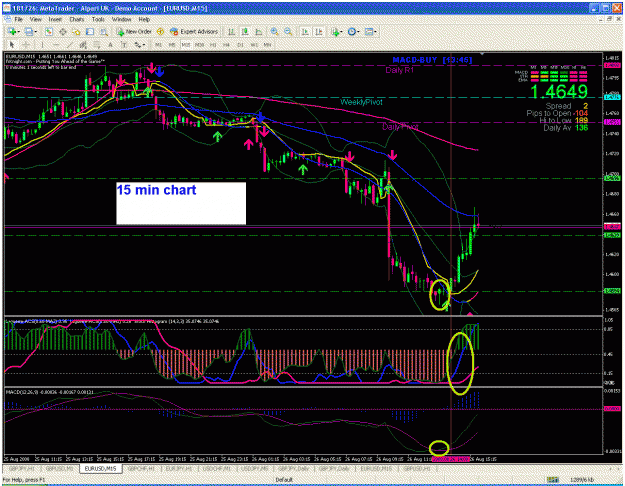
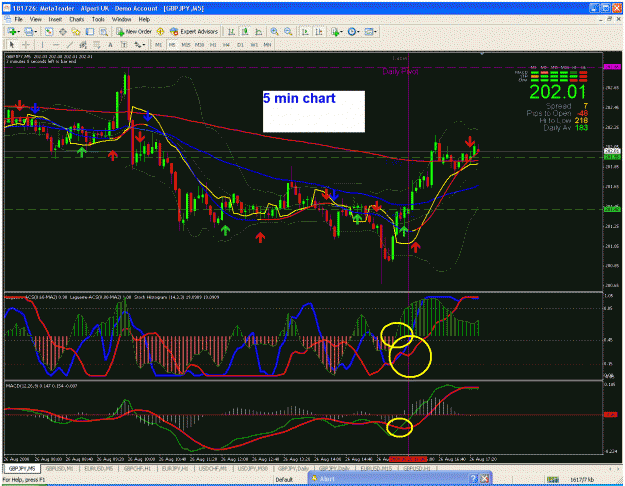
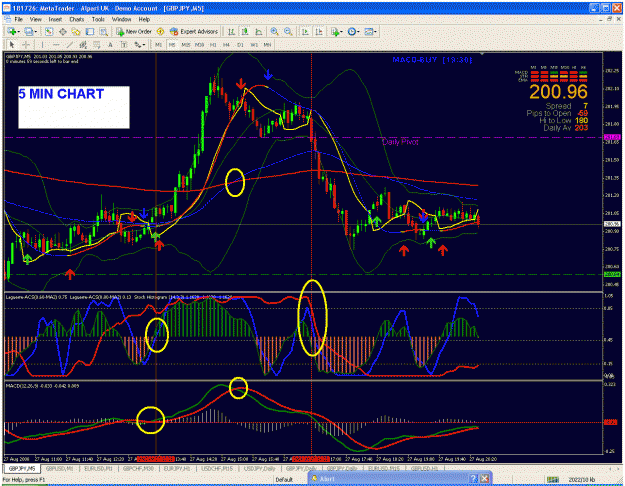
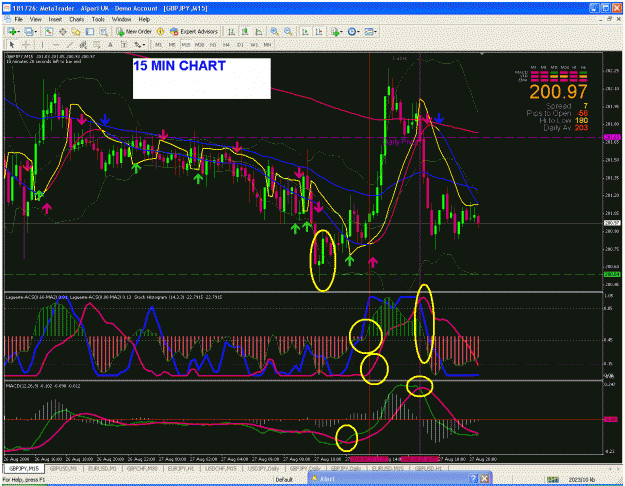
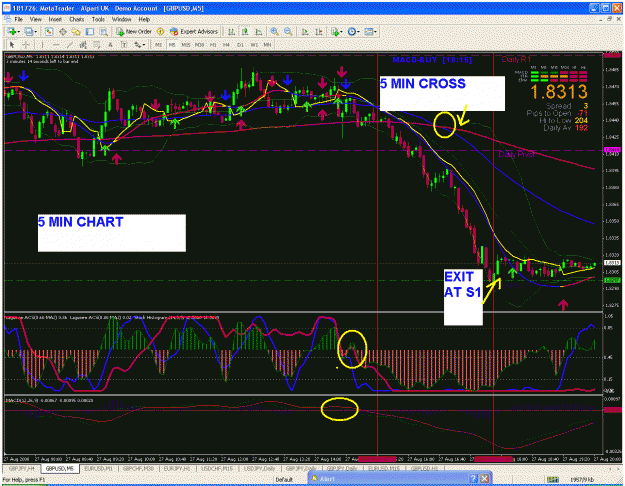
1 – The lags need to fall below or rise above the two levels of 0.85 & 0.15 to give a buy or sell signal. The blue lag will move first followed by the red lag, but the red lag is the stronger one. As the lags move above or below the 0.45 level or stay firmly at the top or bottom, you will see larger moves in the corresponding directions. I use the lags with the stoch-histogram, using them on all the timeframes in the order of 1min upwards. For example, take a look at 1min, 5min and 15 min charts as the timeframe increases, the stoch-histogram turns from up from negative to positive giving a buy signal.
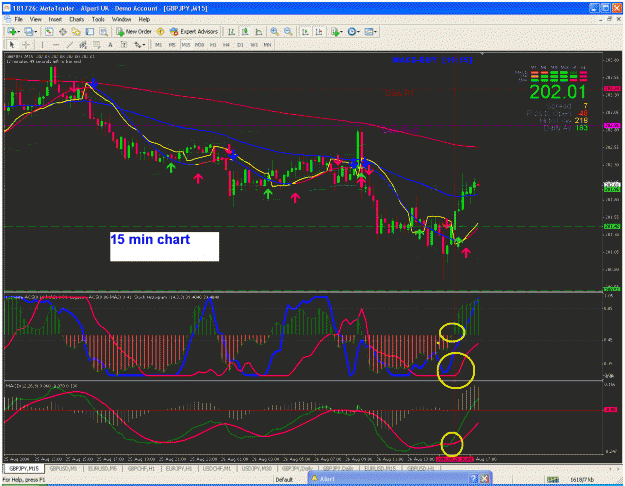
2 – The other method is to use the blue lag with the 60ema and the red lag with the 200ema so blue to blue and red to red. Basically, the idea is to use the lags with the ema’s to work out the strength of the move when the lags are at the extremes (top or bottom) on a particular timeframe. In this case, the lags are at the top on the 5min chart. If both the blue and red lags are at the top and stay there then the price should break above the 60ema and 200ema as it did. On the 1min timeframe the blue lag and the red lag came down at different points to test the 60ema, but even when the red lag came off it couldn’t break below the 60ema telling you there is more room to the upside. Hence, I moved my stops according to the ema’s. Another example would be to look at the blue lag on the 4hr chart. It came up, hit the top and back down and failed to hit the 60ema showing more potential movement to the downside.
MACD, Gann, B-Bands etc
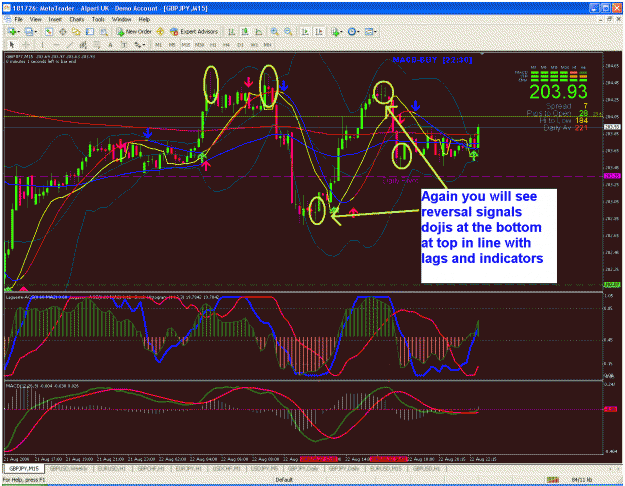
MACD - The crossing of the lines has to be corresponding to the trade, also above and below the 0 mark gives indication of direction.
Gann - as the price moves above the gann line it’s a buy signal and below it’s a sell signal.
B-Bands – The Bollinger Bands can be used to look out for the breaks of the mid-line or when the price breaks out of the top or through the bottom for reversal patterns. For example, the 30 min chart where the doji formed.
These are the additional indicators I use, if you are already using other indicators you may be able to use them with this method. For example, I also use the Fibonacci Retracement and Extension levels.
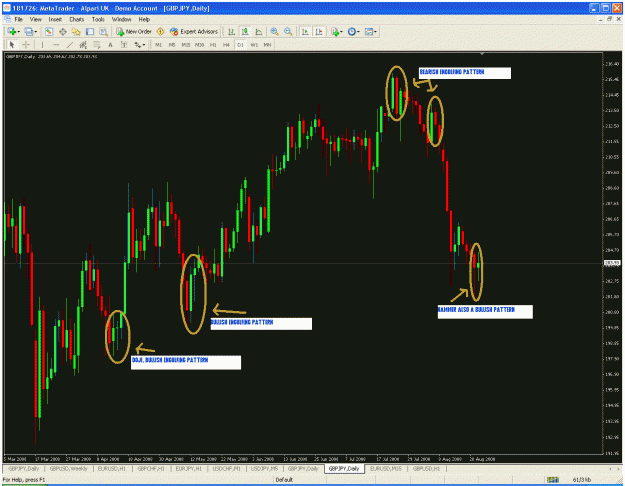
Some knowledge of candlestick chart patterns is essential and it’s well worth putting the effort in to learn them. I post charts of trades and I will refer to some patterns. Firstly, I tend to look at the weekly charts and I look for candlestick patterns with the direction of the lags. Then, the main chart that I use is the daily one as this gives you the general direction for the day and the days ahead. All you need is to spot the potential patterns and the general direction.
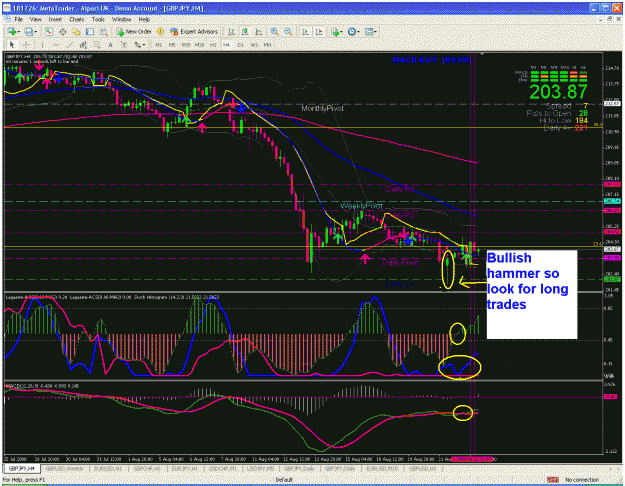
Once you have looked at the daily chart, lower your time frame to the 4hr chart, again try to spot the patterns forming and use the lags with the other indicators to look for trades in the general direction. Below, I have posted the daily chart and the 4hr, on the 4hr we have a bullish hammer so we look for a long entry with the best entry by going all the way down to the 1 min chart
Money Management
This is the most important step in trading, please remember that 95% of forex traders lose money and by not having a good money management plan it will wipe out your account sooner or later. A lot of people learn this lesson when it’s too late so have a trading plan in place and stick with it. Don’t try to become a millionaire overnight because it just won’t happen. Taking losses is a part of the game, so always put stop losses in place and do not use mental stops as they don’t work. At the end of each week, month or year what you need is more winning trades than losing trades and you will be part of the 5% of traders who make money. If you get stopped out don’t start worrying about what losses you need to make back, that will most likely result in more bad trades. Instead concentrate on making the next trade profitable.
When I first started to trade this method I used a 0.5% risk and a 1% reward ratio per trade. I used this for 3 months and with a very good percentage of wins. After 3 months I increased my risk to 1% and reward to 2% whilst still maintaining a 1:2 risk reward ratio and continued to have a good percentage of wins. Currently I am using a 2% risk with a 4% reward ratio and tend to scale this down depending on the setup I see. This is a high risk strategy and I don’t recommend it. I would say start with a smaller risk reward ratio until you are confident with the system and have made positive pips over a decent period of time.
I trade the following pairs with this method;
GBP/JPY GBP/USD EUR/USD GBP/CHF EUR/JPY USD/JPY
It works on most currency pairs and it can also be used on indices such as the DOW and commodities such as gold and oil too.
Indicators
60 and 200 Day Exponential Moving Averages
200 is red and 60 is blue
Auto Pivots
Use Sunday data - should be set to false
Laguerre – ACS1
On the Common tab fixed minimum -0.05 fixed maximum 1.05 for both Lags.
Blue Laguerre – Inputs tab – gamma 0.6 - Maxbars 1000
Red Laguerre – Inputs tab – gamma 0.8 – Maxbars 1000
Levels: 0.15, 0.45, 0.85
Stoch Histogram – 14,3,3
MACD – 12,26,9
Gann HiLo V2
Bollinger Bands
Chandra- SAS5
How to use the indicators
Ema’s
There are 2 ways I use them:
1 – The crossovers – by this I mean when the 60ema crosses over the 200ema and vice versa. Take a look at the 1 min entry chart, once the price is above the 200ema this would be a safe entry for a long with a stop below the 60ema or below the recent low to be safer. As the 2 ema’s cross over each other and the 200ema is below the 60ema the trade would be safe by moving the stop loss below the 200ema and eventually below the 60ema as the trade progresses. In this case, the price moves above the daily pivot so once a cross takes place you know that this is the direction of the trade. This applies to all the time frames. On a day when there is movement in a single direction, you will notice that the crossovers will take place on 1min chart followed by the 5min, 15min etc. In between these crosses, there will be a price movement pulling back to the ema’s in order to make the crossovers on the higher timeframes. Bear in mind that not all timeframes will show a crossover of the ema’s.
2 – Using them as support and resistance levels– once again you can use this on all the timeframes. For example, on the 1min chart at the point of exiting the trade, the candle closed below the 60ema in line with the other indicators giving a sell signal. Also, take a look at the 30min chart as it failed to break above the 200ema and gave a clear reversal pattern in the form of a doji. I move my stops according to the ema’s on the 1min or 5min charts but I will explain this in more detail later.
Pivots
These are your support and resistance levels. You should look to enter or exit a trade at these levels. For example, if you look at the 30min or 1hr chart you will see that the price bounced off S1 with clear reversal patterns on both timeframes.
Laguerre
I also use these in 2 ways:
1 – The lags need to fall below or rise above the two levels of 0.85 & 0.15 to give a buy or sell signal. The blue lag will move first followed by the red lag, but the red lag is the stronger one. As the lags move above or below the 0.45 level or stay firmly at the top or bottom, you will see larger moves in the corresponding directions. I use the lags with the stoch-histogram, using them on all the timeframes in the order of 1min upwards. For example, take a look at 1min, 5min and 15 min charts as the timeframe increases, the stoch-histogram turns from up from negative to positive giving a buy signal.
2 – The other method is to use the blue lag with the 60ema and the red lag with the 200ema so blue to blue and red to red. Basically, the idea is to use the lags with the ema’s to work out the strength of the move when the lags are at the extremes (top or bottom) on a particular timeframe. In this case, the lags are at the top on the 5min chart. If both the blue and red lags are at the top and stay there then the price should break above the 60ema and 200ema as it did. On the 1min timeframe the blue lag and the red lag came down at different points to test the 60ema, but even when the red lag came off it couldn’t break below the 60ema telling you there is more room to the upside. Hence, I moved my stops according to the ema’s. Another example would be to look at the blue lag on the 4hr chart. It came up, hit the top and back down and failed to hit the 60ema showing more potential movement to the downside.
MACD, Gann, B-Bands etc
MACD - The crossing of the lines has to be corresponding to the trade, also above and below the 0 mark gives indication of direction.
Gann - as the price moves above the gann line it’s a buy signal and below it’s a sell signal.
B-Bands – The Bollinger Bands can be used to look out for the breaks of the mid-line or when the price breaks out of the top or through the bottom for reversal patterns. For example, the 30 min chart where the doji formed.
These are the additional indicators I use, if you are already using other indicators you may be able to use them with this method. For example, I also use the Fibonacci Retracement and Extension levels.
Some knowledge of candlestick chart patterns is essential and it’s well worth putting the effort in to learn them. I post charts of trades and I will refer to some patterns. Firstly, I tend to look at the weekly charts and I look for candlestick patterns with the direction of the lags. Then, the main chart that I use is the daily one as this gives you the general direction for the day and the days ahead. All you need is to spot the potential patterns and the general direction.
Once you have looked at the daily chart, lower your time frame to the 4hr chart, again try to spot the patterns forming and use the lags with the other indicators to look for trades in the general direction. Below, I have posted the daily chart and the 4hr, on the 4hr we have a bullish hammer so we look for a long entry with the best entry by going all the way down to the 1 min chart
Attached Image(s) (click to enlarge)
"Through inquiring of the old we learn the new"